> ## Documentation Index
> Fetch the complete documentation index at: https://docs.globalai.vip/llms.txt
> Use this file to discover all available pages before exploring further.
# ChatGPT(Codex) 接入 Global AI:CC Switch 与手动配置
> 在 ChatGPT(Codex) 客户端中接入 Global AI,通过 CC Switch 一键切换或手动编辑 config.toml 与 auth.json。
ChatGPT(Codex) 是 OpenAI 官方的命令行与桌面客户端。本页面说明如何把它接入 Global AI,替代直连官方 API。桌面端下载地址:[openai.com/zh-Hans-CN/codex](https://openai.com/zh-Hans-CN/codex/)。
Codex 配置中的密钥必须使用 **Codex 分组** 的令牌,其他模型厂商的令牌无法调用。请在 [globalai.vip/keys](https://globalai.vip/keys) 创建密钥时选择 codex 分组。
以下两种方式任选其一:**CC Switch** 适合桌面端图形化操作,**手动配置** 适合熟悉命令行与配置文件的用户。
## 方式一:CC Switch(推荐)
CC Switch 是一款一键切换供应商的桌面工具,同时支持 Claude Code 与 ChatGPT(Codex)。下载地址:[github.com/farion1231/cc-switch/releases](https://github.com/farion1231/cc-switch/releases)。
Global AI 支持将 API 配置一键导入 CC Switch,步骤如下:
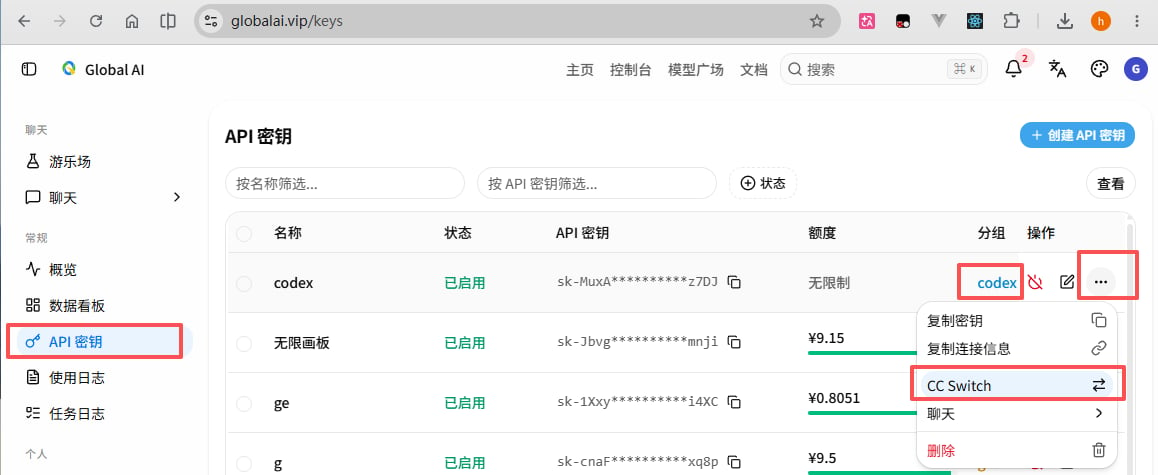
登录 Global AI 平台,在左侧菜单进入「API 密钥」,或直接打开 [globalai.vip/keys](https://globalai.vip/keys),创建一个位于 **codex 分组** 的密钥。
在刚创建的密钥最右侧点击「...」按钮,在下拉菜单中选择「CC Switch」。
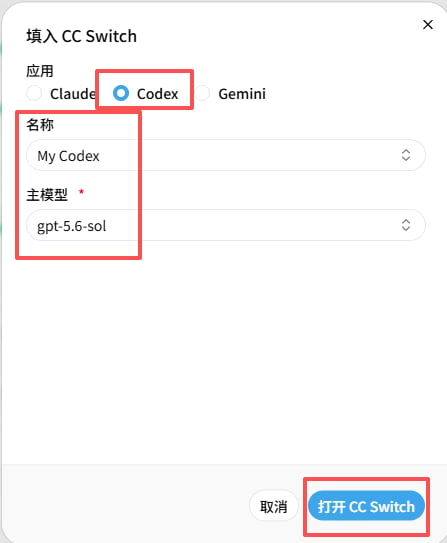
 在弹出的对话框中:
* **应用**:选择 `Codex`
* **名称**:按需自定义
* **主模型**:选择 `gpt-5.6-sol`
确认无误后点击底部的「打开 CC Switch」。
在弹出的对话框中:
* **应用**:选择 `Codex`
* **名称**:按需自定义
* **主模型**:选择 `gpt-5.6-sol`
确认无误后点击底部的「打开 CC Switch」。
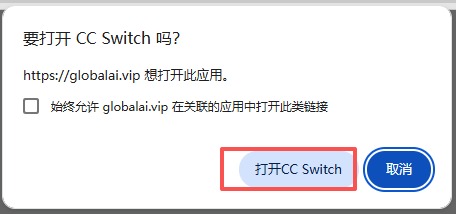
 在浏览器弹出的对话框中确认打开 CC Switch 应用。
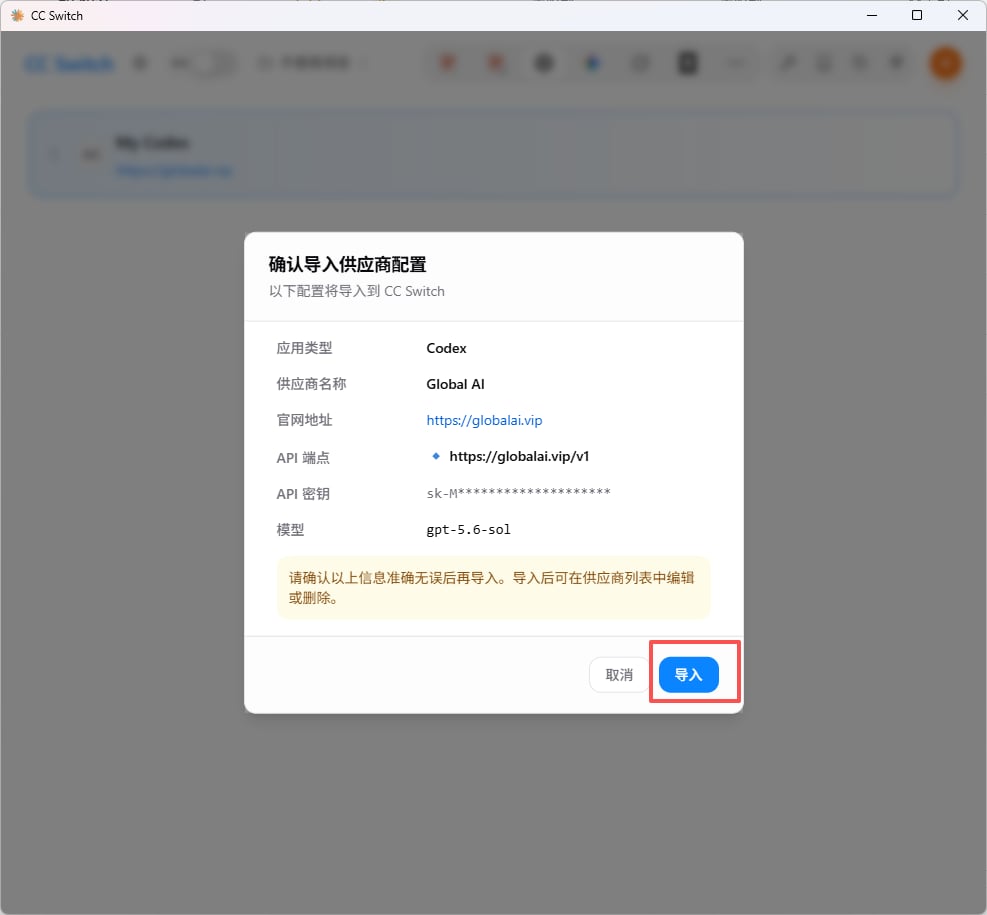
 在 CC Switch 中点击「导入」,等待提示导入成功。
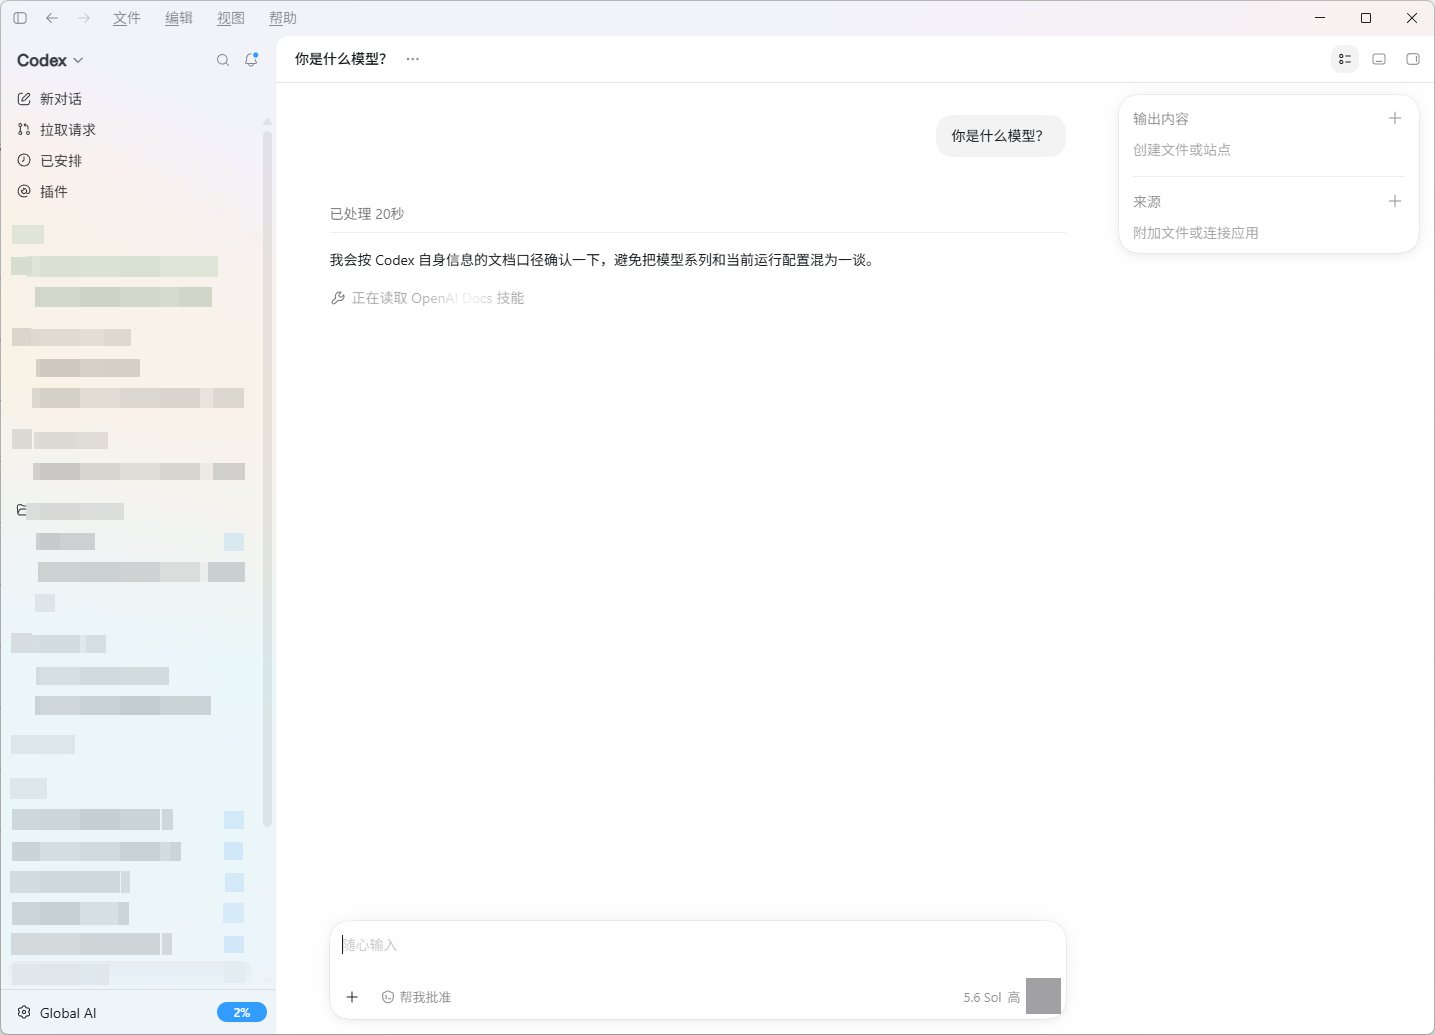
 打开 ChatGPT(Codex) 客户端,发送一条测试消息。
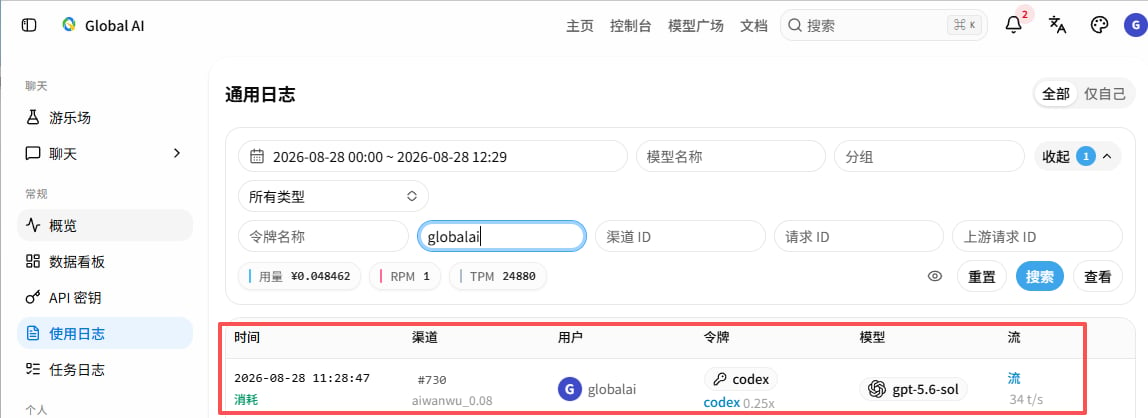
 进入 [使用日志](https://globalai.vip/usage-logs/common),若能看到与测试同一时间的调用记录,则代表接入成功。
 ## 方式二:手动配置
从 [openai.com/zh-Hans-CN/codex](https://openai.com/zh-Hans-CN/codex/) 下载并安装桌面客户端。
根据操作系统找到配置文件路径:
* **Windows**:`C:\Users\你的用户名\.codex\config.toml`
* **macOS / Linux**:`~/.codex/config.toml`
写入以下内容:
```toml config.toml icon=file-code theme={null}
model_provider = "globalai"
model = "gpt-5.6-sol"
model_reasoning_effort = "high"
disable_response_storage = true
[model_providers.globalai]
name = "globalai"
base_url = "https://globalai.vip/v1"
wire_api = "responses"
requires_openai_auth = true
```
根据操作系统找到文件路径(不存在请自行创建):
* **Windows**:`C:\Users\你的用户名\.codex\auth.json`
* **macOS / Linux**:`~/.codex/auth.json`
写入 codex 分组密钥:
```json auth.json icon=file-code theme={null}
{
"OPENAI_API_KEY": "替换为您的 codex 分组 API Key"
}
```
重启 ChatGPT(Codex) 客户端,发送一条测试消息,并在 [使用日志](https://globalai.vip/usage-logs/common) 中确认调用记录已生成。
## 在 VS Code 中使用
上述任一方式生效后,在 VS Code 扩展市场安装官方 Codex 插件,即可在 IDE 中直接调用 Global AI。
## 排查
确认使用的是 **codex 分组** 令牌,而非其他模型厂商的令牌。可以在 [globalai.vip/keys](https://globalai.vip/keys) 编辑令牌查看其分组。
模型 ID 可能随平台调整而更新,请以 [globalai.vip/pricing](https://globalai.vip/pricing) 中显示的 Codex 相关模型 ID 为准。
## 参考链接
* [ChatGPT(Codex) 官方页面](https://openai.com/zh-Hans-CN/codex/)
* [Global AI 模型定价](https://globalai.vip/pricing)
## Related topics
- [Claude Code 接入 Global AI:CC Switch 与手动配置](/zh/clients/claude-code.md)
- [Global AI 客户端接入总览:常用参数与选型](/zh/clients/overview.md)
- [ChatBox 接入 Global AI:桌面与手机端配置](/zh/clients/chatbox.md)
- [OpenCode 与 CC-Switch 接入 Global AI 指南](/zh/clients/opencode.md)
- [ChatWise 接入 Global AI:多提供商统一配置指南](/zh/clients/chatwise.md)
## 方式二:手动配置
从 [openai.com/zh-Hans-CN/codex](https://openai.com/zh-Hans-CN/codex/) 下载并安装桌面客户端。
根据操作系统找到配置文件路径:
* **Windows**:`C:\Users\你的用户名\.codex\config.toml`
* **macOS / Linux**:`~/.codex/config.toml`
写入以下内容:
```toml config.toml icon=file-code theme={null}
model_provider = "globalai"
model = "gpt-5.6-sol"
model_reasoning_effort = "high"
disable_response_storage = true
[model_providers.globalai]
name = "globalai"
base_url = "https://globalai.vip/v1"
wire_api = "responses"
requires_openai_auth = true
```
根据操作系统找到文件路径(不存在请自行创建):
* **Windows**:`C:\Users\你的用户名\.codex\auth.json`
* **macOS / Linux**:`~/.codex/auth.json`
写入 codex 分组密钥:
```json auth.json icon=file-code theme={null}
{
"OPENAI_API_KEY": "替换为您的 codex 分组 API Key"
}
```
重启 ChatGPT(Codex) 客户端,发送一条测试消息,并在 [使用日志](https://globalai.vip/usage-logs/common) 中确认调用记录已生成。
## 在 VS Code 中使用
上述任一方式生效后,在 VS Code 扩展市场安装官方 Codex 插件,即可在 IDE 中直接调用 Global AI。
## 排查
确认使用的是 **codex 分组** 令牌,而非其他模型厂商的令牌。可以在 [globalai.vip/keys](https://globalai.vip/keys) 编辑令牌查看其分组。
模型 ID 可能随平台调整而更新,请以 [globalai.vip/pricing](https://globalai.vip/pricing) 中显示的 Codex 相关模型 ID 为准。
## 参考链接
* [ChatGPT(Codex) 官方页面](https://openai.com/zh-Hans-CN/codex/)
* [Global AI 模型定价](https://globalai.vip/pricing)
## Related topics
- [Claude Code 接入 Global AI:CC Switch 与手动配置](/zh/clients/claude-code.md)
- [Global AI 客户端接入总览:常用参数与选型](/zh/clients/overview.md)
- [ChatBox 接入 Global AI:桌面与手机端配置](/zh/clients/chatbox.md)
- [OpenCode 与 CC-Switch 接入 Global AI 指南](/zh/clients/opencode.md)
- [ChatWise 接入 Global AI:多提供商统一配置指南](/zh/clients/chatwise.md)